All published articles of this journal are available on ScienceDirect.
Analysis of the Performance of a Standardized Method for the Polishing of Methacrylic Resins
Abstract
Adhesion of micro-organisms to resin surface may be caused by inadequate polishing. Most of the studies published in literature are relative to manually prepared samples and do not take into account that test repeatability is not guaranteed a priori since skills may change from one operator to another and the quality of the work done by the same expert operator may depend on “human” factors such as the level of attention, wrist trembling, etc.
This paper aims to investigate on the efficiency and reliability of a standardized protocol for polishing methacrylic resins. For that purpose, five different methacrylic resins are considered. For each resin, 20 specimens are realized: 10 are polished by the same expert operator and 10 are polished by means of a mechanical system comprised of a milling tool, a mobile support for samples and a micrometric advance isoparallelometer. Roughness measurements are carried out with a ±0.01 µm resolution profilometer.
An extensive statistical analysis is conducted on a population of 100 specimens. Two-way Analysis of Variance (ANOVA) is carried out taking the type of resin (i) and the polishing technique (ii) as predictors in order to evaluate how those variables will finally affect the roughness of the polished surface. The significance of the variable interaction term is assessed. The null hypothesis Ho where response is independent from individual factors as well as from their interaction is assumed to hold true for p-values>0.05 (interval of confidence of the 95%).
Experimental data confirm that mechanical polishing leads to obtaining surfaces of much more uniform quality. In fact, statistical dispersion of roughness parameters can decrease significantly. This behavior is observed for all of the tested resins. Therefore, the new approach can eliminate the influence of “human” factors thus making it possible to assess the inherent features of each resin and compare different dental materials submitted to polishing.
INTRODUCTION
Methacrylic resins are largely utilized in dentistry to realize removable prostheses and orthodontic appliances. Since these materials work in the oral cavity accurate polishing is of primary importance. In fact, in vitro analyses demonstrated that micro-organisms adhere better on rough surfaces (Radford JPD 1997) [1]. In removable prostheses, accurate polishing of edges and surfaces may limit accumulation of bacterial plaque and increase biocompatibility (Ulusoy JPD 1986) [2] (O’ Donnell IJP 2003) [3]. Furthermore, adequate polishing can significantly reduce the risk of fatigue failures that usually occur near surface defects (Ellyn 1997) [4].
Relationships between polishing protocols and surface roughness were deeply investigated in literature. For example, Sen et al. (Sen JPD 2002) [5] compared the surface roughness of three different bisacrylic composite-based and three different methylmethacrylate-based resins for provisional crown and fixed partial denture that were polished with aluminum oxide and diamond paste. Kuhar and Funduk (Kuhar JPD 2005) [6] observed that the surface roughness of acrylic denture base resins depends on the polishing technique utilized. Berger et al. (Berger JP 2006) [7] compared the effects of three chairside polishing kits and conventional polishing on four different denture acrylic resins. Heintze et al. (Heintze DM 2006) [8] analyzed the influence of polishing time and press-on force on the surface gloss and roughness of dental materials by using a three-component rubber-based polishing system. Alves et al. (Alves AO 2007) [9] conducted a laboratory evaluation of the surface roughness of acrylic resins after different curing and polishing techniques. Goncalves et al. (Goncalves AO 2008) [10] measured the surface roughness of auto-polymerized acrylic resins for different manipulation - mass and addition - and polishing - mechanical and chemical - methods. Oliveira et al. (Oliveira JP 2008) [11] evaluated the abrasion resistance of acrylic resin to routine dental brushing procedures using different dentifrices after that resin surface was chemically or mechanically polished.
It appears from the literature that the roughness of dental acrylic resins is mainly affected by material inherent features, polishing technique and operator’s manual skills. However, on the knowledge of the present authors, the influence of the “human factor” (i.e., operator’s skills, level of attention, wrist trembling, etc.) on the resulting surface roughness never was addressed in a systematic fashion. In fact, while precise standards (ISO 20795-1:2008, formerly ISO 1567:1999/Amd1:2003 similar to ADA/ANSI Specification No. 12) [12] regulate the first two aspects, no clear indications are given on operator’s skills and working conditions. The first attempt to overcome this limitation was made by the present authors who proposed a standardized method of polishing methacrylic resins independently from individual operator’s skills (Corsalini IJP 2008) [13]. The availability of a standardized protocol would indeed ensure operation repeatability thus allowing relative merits of different resins to be compared on a more homogeneous basis.
This paper aims to analyze in detail the effectiveness and overall performance of the above mentioned protocol. A detailed study conducted on 100 specimens made of five different methacrylic resins is presented in order to confirm the possibility and the benefit of using a standardized polishing protocol.
MATERIALS AND METHODS
Specimens
Five different dental resins were studied in this research:
A) Probase Hot (Heat-curing denture base; Powder: polymethylmethacrylate, plasticiser, pigments and catalysts, density: 1.2 g/cm3 (@ 20 °C); Liquid: Mixture of Methylmethacrylate, dimethacrylate and catalyst, density: 0.94 g/cm3 (@ 20 °C), viscosity: 0.6 cP (@ 20 °C), solubility in water: 1.6 g/l; Ivoclar Vivadent Inc., Lichtenstein);
B) Probase Cold (Cold-curing denture base; Powder: polymethylmethacrylate, plasticiser, pigments and catalysts, density: 1.2 g/cm3 (@ 20 °C); Liquid: Mixture of methylmethacrylate, dimethacrylate and catalyst, density: 0.94 g/cm3 (@ 20 °C), viscosity: 0.6 cP (@ 20 °C), solubility in water: 1.6 g/l; Ivoclar Vivadent Inc., Lichtenstein);
C) Palapress (Cold-curing denture base; Powder: methylmethacrylate-copolymer, density: 0.9-0.95 g/cm3 (@ 20 °C); Liquid: methylmethacrylate, dimethacrylate and catalyst, density: 0.950 g/cm3 (@ 20 °C), viscosity: 1 cP (@ 20 °C); Heraeus Kulzer, Hanau, Germany);
D) SR Ivocap (Heat/pressure curing resin; Powder: polymethylmethacrylate, copolymer; Liquid: methylmethacrylate, dimethacrylate, density: 0.943 g/cm3 (@ 20 °C), viscosity: 0.6 cP (@ 20 °C), solubility in water: 1.6 g/l; Ivoclar Vivadent Inc., Lichtenstein);
E) Leocryl (Orthodontics self-curing resin; solubility in water: 15.9 g/l (@ 20 °C), viscosity: 0.6 cP; Leone S.p.A., Florence, Italy).
For each material, 20 samples – each measuring 20×20×5 mm – were prepared: 10 were manually polished and 10 were polished with a mechanical milling system. Specimens were hence divided into 10 different groups: 5 groups included the manually polished samples made of each material (denoted as “MANUAL” in the rest of the paper) while the other 5 groups included the mechanically polished samples (denoted as “MECHANICAL” in the rest of the paper). A total of 100 specimens were considered in the experiments. Fig. (1) shows one sample of each group.
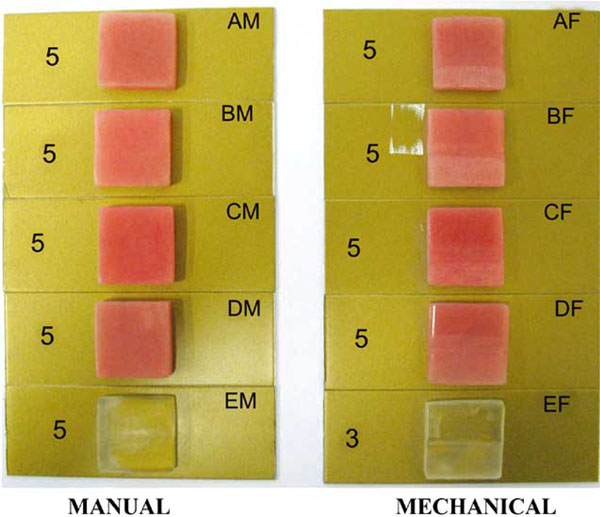
Manually (left) and mechanically (right) polished resins tested in this study.
Polishing Technique
Fig. (2) shows the mechanical system for resin polishing used in this research. A mobile support carries an aluminum plate onto which the resin specimen is fixed. A perpendicular slot is obtained on the mobile support in order to insert the aluminum plate. The support is mounted on the carrying platform of a micrometric isoparallelometer with 0.1 mm advance. The speed of the motorized tool mandrel can range between 0 and 20,000 rpm (Precies Metaux, Neuchatel, Switzerland). Parallelism between the sample and the working axis of the tool is ensured. The working tool speed is 5000 rpm as it progresses in the horizontal direction. Manual polishing was conducted by a single experienced operator. All samples in each group were polished by following steps traditionally prescribed by the ISO 20795 standard [12] using a tungsten carbide bur with a thin cross cut (ISO n. 500 104 302602 291) followed by a coarse grain cylindrical rubber top bur for acrylic resin (Super Acrilic Polish, Long Dental, Wheeling (IL), USA) and then a fine grain cylindrical rubber top bur (Super Acrilic Polish, Long Dental, Wheeling (IL), USA). Next, a soft bristle brush with pumice dust, mixed to an equal volume of water, followed by a soft bristle brush with polishing dust. In order to guarantee test repeatability and to compare experimental results on a homogeneous basis, new burs were used at every step of both manual and mechanical polishing. Burs were changed for each sample.
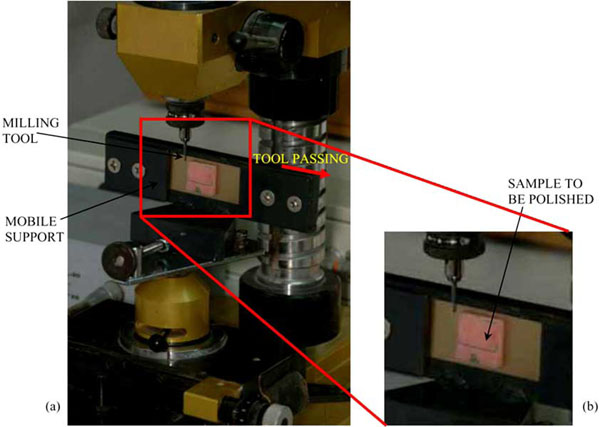
(a) Schematic of the mechanical polishing device with a sample mounted on its support; (b) detail view of the milling tool utilized for the polishing.
Measurements and Statistical Analysis
Surface roughness was measured by means of a ±0.01 µm resolution profilometer Mahr® GD25 (Mahr Inc., Gottingen, Germany). The roughness parameters Ra, Rz and Rtot were determined. As is specified in the ISO4287 standard, Ra corresponds to the average of peak and valley distances; Rz is the average height of the five highest local peaks plus the average height of the five lowest local valleys [14]. Filtered height values must be used to compute roughness parameters. However, filtered height values are different from real height values measured directly by the profilometer. For a given surface like that shown in Fig. (3a) the deviation from planarity is obtained by summing over the roughness (Fig. 3b) (i.e., the distribution measured following ISO 4287), “long wavelength” irregularities (Fig. 3c) and geometric shape errors (Fig. 3d). For example, Fig. (3e) shows how the original distribution of surface height detected by the profilometer will change if an high-pass filter is utilized according to ISO4287. Surface waviness – related to long wavelength irregularities – is removed thus leaving only the high frequency irregularities that are usually referred to as “roughness”. In order to have a more detailed description of the surface features exhibited by the two collections MECHANICAL and MANUAL, another parameter, designated as Rtot, was introduced. The new parameter Rtot is defined in the same way as Ra but unfiltered values of surface height are now considered.
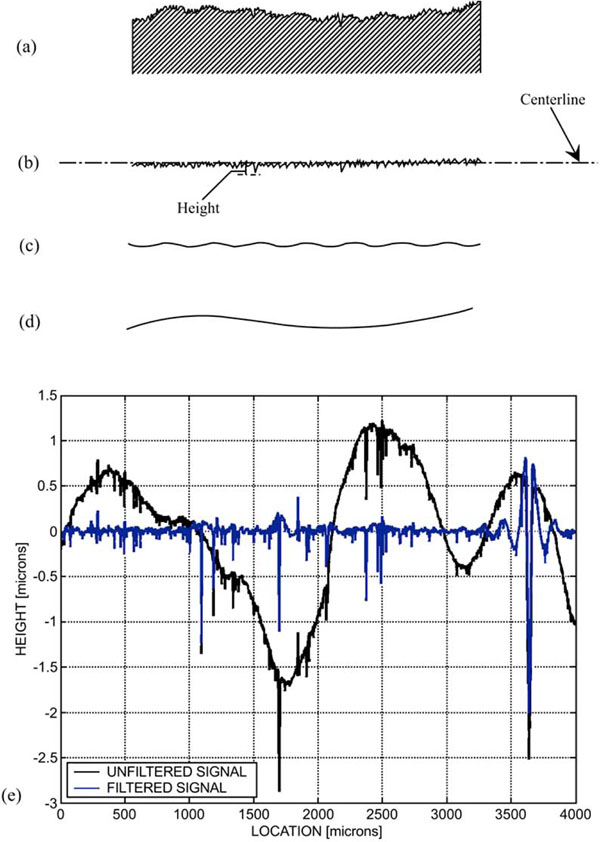
Surface (a) results from the sum over roughness (b), low frequency irregularities (c) and shape errors (d); e) Surface waviness corresponding to “long wavelength” irregularities (black curve) is removed thus leaving the high frequency irregularities (blue curve) referred to as “roughness”.
The average value and the standard deviation were computed for all roughness parameters Ra, Rz and Rtot. In addition, the percent variation coefficient (CV), defined as the ratio between standard deviation and average value, was utilized. While the standard deviation measures the dispersion of a given set of values, the CV parameter allows data dispersion to be correlated with the average value of the measured quantity. Therefore, high values of CV will indicate a large dispersion with respect to the average measure and then low reliability of measurements.
A two-way Analysis of Variance (ANOVA) was conducted in order to understand how the distribution of surface roughness Rtot resulting from the polishing operation can be affected by the following two factors: (i) type of resin (the five different materials denoted as A, B, C, D and E in the “Specimens” section) and (ii) polishing technique (MANUAL or MECHANICAL). Since factor (i) can take 5 levels and factor (ii) can take 2 levels, a total of 5×2=10 groups were formed with 10 replications for each group. Therefore, the total number of specimens analyzed in the experimental tests was equal to 100. The statistical significance of the above mentioned individual factors as well as the importance of mutual interaction were assessed.
RESULTS
The average values of Ra measured for the manually polished samples are comparable in magnitude with those measured for the mechanically polished samples (Fig. 4a). The same was observed for parameters Rz (Fig. 4b) and Rtot (Fig. 4c). However, the level of roughness for the manually polished samples is globally higher than for the mechanically polished samples. This is confirmed by Fig. (5) that shows significant differences in the percent coefficient of variation CV. The manual polishing process resulted in much larger dispersions with respect to the average roughness value. The same behavior was seen for each material analyzed in this research. In particular, for the manually polished samples, the CV parameter ranged between 35% and 58% while, for the mechanically polished samples, CV was always less than 18%.
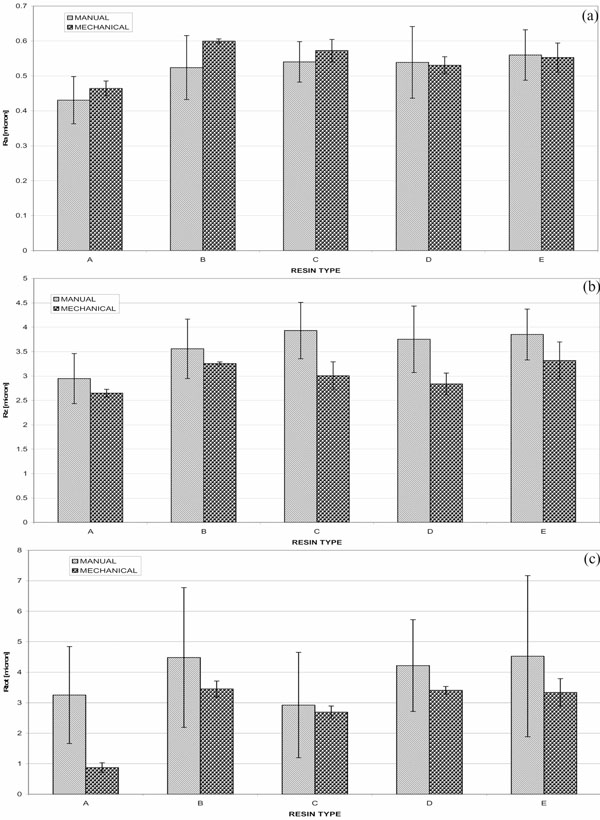
Average values and standard deviations of roughness parameters Ra (a), Rz (b) and Rtot (c) measured for the different materials.
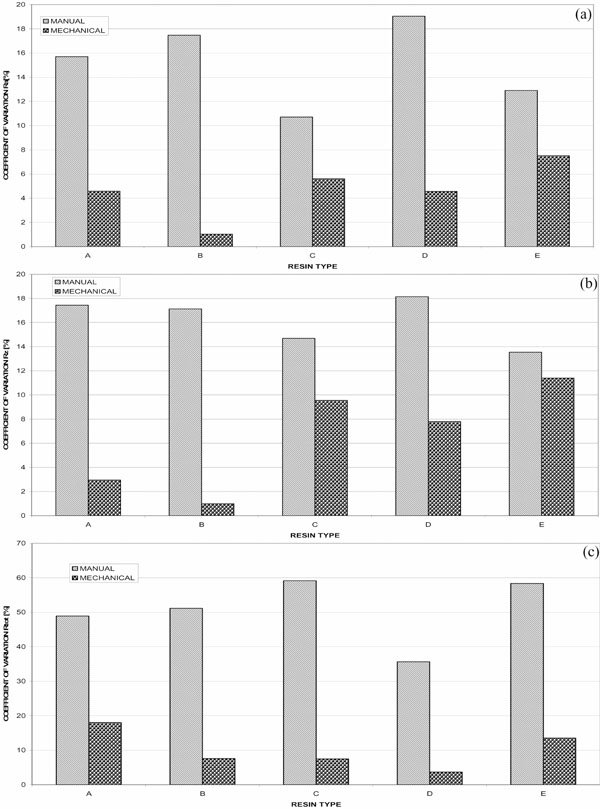
Percent variation coefficient CV evaluated for roughness parameters Ra (a), Rz (b), Rtot (c).
The null hypothesis Ho was assumed to hold true if the p-value is greater than 0.05. In that case, differences between populations from which the investigated samples were extracted are not statistically significant. In view of this assumption, ANOVA results demonstrate that the roughness parameter Rtot certainly depends on the resin type (p-value=0.000) and polishing technique (p-value=0.000). Conversely, the interaction term was found not to be significant (p-value=0.203).
Fig. (6) shows the statistical distribution of the height values sensed by the profilometer typically observed for manually and mechanically polished samples. It can be seen that the data trend is fitted by a Gaussian curve only in the case of mechanically polished samples.
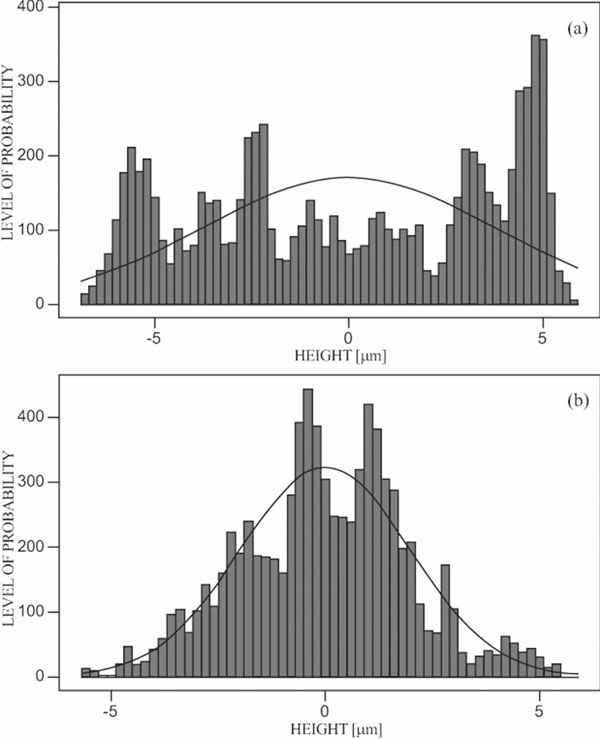
Probability of having a given height of the surface for manually polished specimens (a) and mechanically polished specimens (b).
DISCUSSION
This study presented an extensive experimental campaign carried out on 100 samples made of five different dental resins polished manually or mechanically. Although the values of Ra and Rz are of the same order of magnitude for both manually and mechanically polished samples, significantly different data were found for the Rtot coefficient (Fig. 4c). It should be noted that, by adding to the average value of Rtot the corresponding standard deviation, the resulting values of Rtot determined for the mechanically polished samples are always smaller than the average values of Rtot evaluated for the manually polished samples. This is because Ra and Rz were evaluated from filtered surface height values while Rtot is the average of unfiltered peak and valley distances from the mean profile of the surface. Therefore, the filtering operation eliminated the deepest asperities of the surface (i.e., long wavelength irregularities) thus smoothing the differences observed in terms of Ra and Rz between the mechanically and manually polished samples. However, from the clinical point of view, the information on Rtot is more important since one has to deal with the real profile of the resin surface that is effectively described just by the Rtot parameter.
The analysis of roughness parameters indicated that manual polishing leads to an increase of the CV parameter (Fig. 5c) for all of the analyzed materials. This is because Ra, Rz and Rtot values measured for the manually polished samples are representative not only of the inherent roughness properties possessed by the investigated surfaces but also of the “human factors” (e.g., skills of the technician, wrist trembling, level of attention, etc.) involved in the manual polishing process. Data relative to mechanical polishing were much less dispersed simply because the efficiency of this protocol does not depend any more on the “human factors”. Conversely, the level of quality achieved in the polishing operation never can be predicted a priori for a manually polished surface since the “human factors” will always represent a totally random component.
The higher values of CV found for the manually polished samples hence support the conclusion that mechanical polishing is a more reliable procedure. This was seen for all of the analyzed materials. Further evidence was gathered from ANOVA which demonstrated the deep relationship between Rtot and the polishing protocol. Since the interaction between the polishing technique and the resin type was found not to be significant, assignment of differences to individual factors can be claimed with no shadow of doubt.
The fact that measured values of surface height were fitted by a Gaussian distribution only in the case of the mechanically polished samples also is a very important finding. The level of quality expected in the polishing operation can be controlled for each different height value as it is described by a well defined probability law.
The present study had some limitations. In the first place, the mechanical polishing technique, although eliminated in principle the effects of the operator’s skills, introduced in its turn other factors of variability such as the type of milling machine utilized, the rotation velocity of the mandrel, the pressure with which the sample is pushed against the milling tool, the type and the dimensions of tool utilized in the polishing operation, etc. However, it is reasonable to assume that the above mentioned parameters are more controllable than the “human factors”.
Secondly, since methacrylic based dentures are not very hard materials, their surface is subject to daily wear: consequently, roughness parameters may continuously change with time. Successive polishing should be operated in order to smooth the resin surface.
Finally, an obstacle to clinical use of the proposed mechanical polishing system may be the sharp curvature of some dental surfaces and the shape irregularity of removable prostheses. An high precision robotic arm carrying the milling tool can solve this problem. The arm’s trajectory should follow the surface topography precisely reconstructed by means of non-contact optical contouring techniques such as projection moiré [15-16] or stereo-photogrammetry [17]. The topographic data are given in input to a control device in order to track the different positions taken by the arm during the polishing operation.
CONCLUSIONS
This study presented an extensive experimental campaign carried out on a population of 100 specimens made of five different types of methacrylic resins. Manual polishing was compared with a standardized mechanical polishing protocol. Experimental results confirmed the benefit in using a standardized method for polishing methacrylic resins. This reduces significantly the effect of operator’s skills on the surface roughness distribution and allows to compare in a more systematic fashion different dental materials for which the polishing criterion is of primary importance.
ACKNOWLEDGMENTS
The support given by Dr. Mauro Carella DDS, Dr. Stefania Tagliente DDS and Mr. Biagio Cicchetti in the preparation of the specimens is gratefully acknowledged.

