All published articles of this journal are available on ScienceDirect.
Effect of Adhesive Gap Setting on Fracture Resistance of All-ceramic Crowns
Abstract
Background:
Several factors might affect the fracture resistance of all-ceramic crowns, including cement thickness.
Aim:
To evaluate the influence of cement thickness on the fracture resistance.
Objective:
To determine the effect of varying the adhesive gap thickness on the fracture loads of all-ceramic CEREC 3D molar crowns.
Methods:
Standardized prepared epoxy resin molar dies (Viade Inc.) were fabricated. A standard molar crown was designed using a CEREC 3D machine (Sirona Dental Systems). Twenty-four crowns were milled from Vita Mark II blocks (Vita Zahnfabrik), using adhesive gap settings of 30, 60 and 90 µm (n=8). A dual-cure resin cement (PanaviaF 2.0, Kuraray) was used to cement the crowns to their respective dies, following manufacturer's recommendation. After 1 week of storage in distilled water at 37°C, each crown was loaded in compression until complete failure in a universal testing machine (Instron 8501) and fracture loads (N) were recorded. Fractured specimens were sectioned to determine cement thickness. Sections were examined using a traveling light microscope to measure cement thickness. Data were statistically analyzed using one-way ANOVA test and Pearson's correlation at (α=0.05).
Results:
The mean fracture loads and standard deviation values in N were 1,267.57 (122.82), 1,225.20 (179.46) and 1,180.76 (161.77) for the crowns with 30, 60 and 90µm, respectively. ANOVA indicated no significant differences among mean fracture strength values (p = 0.55). All crowns failed in a catastrophic mode and were not repairable.
Conclusions:
Adhesive cement gap as achieved with three CEREC 3D settings from 30 to 90µm had no significant effect on fracture strength of crowns made from Vita Mark II blocks.
1. INTRODUCTION
The growing demand for esthetics in combination with health and environmental concerns about some metallic restorations stimulated the profession to explore and consider metal-free tooth-colored alternatives. However, all-ceramic restorations are subject to fracture during function especially in the posterior area. Several factors might influence the fracture resistance of all-ceramic crowns in-vivo. These factors can be divided into the following: factors related to the restoration (restoration geometry and thickness, material composition, processing, finishing and polishing and internal adaptation of the restoration), [1-6] factors related to the supporting structure (modulus of elasticity, and preparation shape, dimensions and geometry) [7-10], and factors related to the cementation (cement thickness, mechanical properties of the cement, adhesion mechanism and efficacy of the bond of the cement) [10-12]. Effect of cement thickness on fracture strength of ceramic restorations was studied on bilayer specimens and on restorations with real dimensions [12-17]. The methodology and results of these studies are summarized in (Table 1).
Till the introduction of Computer-aided Designing/ Computer-aided Manufacturing (CAD/CAM) technology, the only options available for controlling the cement thickness were controlling the thickness of the die spacer paint, either by controlling the number of application or using materials with low film thickness [18], or controlling the thickness of the foil layer/s which are used for the production of porcelain jacket crowns [12]. Unfortunately, both methods are neither accurate nor precise. Currently, most CAD/CAM systems give the option to control the adhesive gap setting which is hypothesized to affect the cement thickness.
The objective of the present study was to compare the fracture load values of all-ceramic crowns made using three adhesive gap settings utilizing CAD/CAM CEREC-3D technology. The null hypothesis of this in-vitro study was that there is no significant difference in the fracture strength among the feldspathic crowns made with three different adhesive gap settings.
2. MATERIALS AND METHODS
The Sample size was calculated using G*power software (version 3.1) at (α=0.05, β=0.1, Effect size =0.8) yielding a total sample size equal to 24 [19]. The effect size was calculated using the fracture load data reported previously for monolithic all-ceramic crowns fabricated with similar dimensions from the same material [20].
Twenty-four prepared replicas for 1st mandibular molar were fabricated using a highly-filled epoxy resin (Viade Products Inc. Camarillo, CA, USA), which has an elastic modulus comparable to that of human dentin and responded to 34% phosphoric acid etching with a formation of surface microroughness [21]. The epoxy replicas were duplicated from a master ivorine 1st mandibular molar die that was prepared to receive all-ceramic crown with 1.5 mm occlusal reduction, 1 mm minimum axial reduction, 6 to 8˚ total occlusal convergence, 1 mm wide circumferential shoulder, two planes facial and lingual reduction and smooth line angles. A digital caliper (Mitutoyo Corporation, Tokyo, Japan) was used to verify that the buccolingual and mesiodistal dimensions of the replicas. These measurements showed a low variability of about 10 to 20 μm [20].
The replicas were positioned in a typodont with mesial and distal ivorine teeth. Then, CEREC 3 intraoral camera was used to acquire an optical impression for the prepared replica and adjacent teeth using with a thin layer of titanium oxide as an optical reflective medium (Vita Zahnfabrik). Twenty-four monolithic crowns were designed following the correlation mode (to correlate the designed crown’s anatomy to an artificial unprepared mandibular molar) using the CEREC software (Version 2.40 R1800; Sirona Dental Systems GmbH, Bensheim, Germany). The unprepared artificial tooth was adjusted in the central fossa to receive a 3 mm loading ball.
All crowns were made using the CEREC 3 milling unit (serial number 02527) from feldspathic blocks (Vita Mark II, shade A 3.5 on Vitapan classic, 14 mm long; Vita Zahnfabrik). The crowns were milled using 1.6 mm cylindrical and cone-shaped diamonds. Cutting diamonds were changed after milling eight crowns followed by the milling unit was calibrated. The crowns were divided equally into 3 groups (n=8) using 3 adhesive gap settings (30, 60 and 90 μm). The following milling parameters were used: a spacer setting of 20 μm, margin thickness of 0 μm, and minimum thickness occlusal of 1,500 μm. After milling, Akzent glazing kit (Vita Zahnfabrik) was used to glaze all crowns according to the manufacturer’s instructions.
All crowns thicknesses at the central fossae were measured to verify the minimal occlusal measurement of 1.5 mm using a calliper (Buffalo Dental Manufacturing Co., Syosset, NY, USA). A digital caliper (Mitutoyo Corporation) was used to measure the mesiodistal and buccolingual dimensions at the height of contour. Independent t-test did not reveal any statistically significant difference among the measured dimension for the 3 experimental groups [20].
The intaglio surfaces of crowns were etched with 9.6% hydrofluoric acid gel (Pulpdent Corporation, Watertown, MA, USA) according to manufacturer’s recommendation. The etched surface was sprayed with water, cleaned in ultrasonic water bath for 60 seconds. The prepared surfaces of teeth replicas were treated using 40% phosphoric acid etching gel (Kuraray America Inc., New York, NY, USA) for 60 seconds, rinsed using water spray and dried with compressed oil-free air. A bonding/silane coupling agent (Clearfil SE bond/Porcelain Bond Activator, Kuraray America Inc.) was applied to the intaglio surface of the crowns following the manufacturer’s instructions. A dual-cure resin cement (Panavia F 2, Kuraray America Inc.) was used to cement the crowns to their respected prepared replicas following the manufacturer’s recommendation. The crowns were firstly seated using finger pressure, followed by removal of excess cement and application of air sealing gel (Oxyguard, Kuraray America Inc.) margins of the crowns for 3 minutes. Next, a static load of 22 N was applied to the crowns for 5 minutes [22]. Then, each crown surface was light-cured (Optilux 501, Kerr Demetron, Danbury, CT, USA) for 20 seconds. One hour after cementation, all crowns were stored in distilled water at 37 ˚C for 1 week. Tables 1 and 2 lists the materials used and some of their physical properties.
| Author (Year) | Samples | Ceramic Material | Cement Thickness | Supporting Structure | Conclusion |
|---|---|---|---|---|---|
| Scherrer (1994) [13] | Bilayer specimens | Machinable glass ceramic (2 mm in thickness) | Ranging between 26 to 297 microns | Chemical-cured composite | A gradual decrease of the fracture load was noticed, that became statistically significant at a cement thickness of 300 microns or more. |
| Tuntiprawon (1995) [12] | Maxillary central incisor Porcelain jacket crowns | Feldspathic porcelain | Ranging between 73 to 122 μm | Cobalt-chromium metal die | Increasing the cement thickness resulted in reduced the fracture load of the crowns. |
| Prakki (2007) [14] | Bilayer specimens | Feldspathic ceramic (1 or 2 mm in thickness) | 100, 200 and 300 μm | Bovine dentin | For 1 mm ceramic thickness: Higher cement film thickness resulted in increased fracture load. 2 mm ceramic thickness: cement thickness has no effect. |
| May (2012) | Non anatomical Crowns | Feldspathic ceramic | 50, 100, 300 and 500 μm | A woven glass-filled epoxy resin | Gradual reduction in the fracture load with the increase in thickness and |
| Rojpaibool (2017) [15] | Bilayer specimens | Lithium Disilicate ceramic (1 mm in thickness) | 100 and 300 μm | Enamel or dentin | Increasing cement thickness resulted in reduction of the fracture load |
| Sagsoz and Yanıkoglu (2018) [17] | Maxillary premolar machinable crowns | Resin nanoceramic, feldspathic glass ceramic, lithium disilicate, and leucite-reinforced ceramics | 30, 90, and 150 μm | Epoxy resin replicas | Cement thickness has no effect on the fracture load |
| Material | Elastic Modulus (GPa) |
Coefficient of Thermal Expansion (10-6.K-1) |
Flexure Strength (MPa) |
Fracture Toughness (MPa*m1/2) |
|---|---|---|---|---|
| Vita Mark II (Vita Zahnfabrik) |
70.6 a | 8.6 b | 103 c | 1.26 d |
| Panavia F 2.0 (Kuraray America Inc.) |
9.6 e | - | 79 e | - |
| Epoxy resin die material (Viade Products Inc.) |
12.9 f | - | - | - |
The dimension from the occlusal surface of the crown to the apical surface of the replica before and after cementation was measured for each sample using a digital calliper (Mitutoyo Corporation) to ensure the crown seating [20]. A threshold of 50 µm was set for the differences between the 2 measurements. None of the samples were rejected for this reason.
All cemented samples were mounted in resin material block (SR Ivolen, Ivoclar Vivadent, Schaan, Liechtenstein) with dimensions matching the loading jig attachment. Each crown was uniaxially-loaded with a 3-mm diameter stainless steel ball at the central fossa in a universal testing machine (Instron 8501, Instron, Canton, MA, USA). Loading was conducted at cross head speed of 1 mm/minute in distilled water at room temperature. The load-displacement data were imported to a software program (Microsoft Office Excel, Redmond, WA, USA) and load-displacement curves were generated. Load-displacement curves were analyzed, and the first drop in the curve was identified and the corresponding load (N) was recorded as load at failure.
All crowns were sectioned mesiodistally at the central fossa. Then, the cement layer thickness was measured using a travelling microscope (Mitutoyo Corporation) at three occlusal points (at the middle and near the two occluso-axial line angles). These measurements were averaged for each crown. Two samples of each group were selected for Scanning Electron Microscopy (SEM) examination. The sections from these samples were sputter-coated with 7 nm of platinum in Polaron E5100 coating unit (Polaron Equipment Ltd., Bedford, UK) and examined using SEM (Hitachi S-2500, Hitachi, Mito City, Japan).
The data was analyzed using a Statistical Package for the Social Sciences (SPSS, Version 23, SPSS Inc., IBM, Somers, New York, USA). Both fracture load and cement thickness data were normally distributed; thus parametric tests were selected. The mean fracture loads and cement thickness were compared among the groups using one-way analysis of variance (ANOVA), followed by post-hoc Tukey’s test (when appropriate). The association between the fracture load and cement thickness was assessed using Pearson's correlation. All statistical tests performed at a significant level of 0.05 and were two-tailed.
3. RESULTS
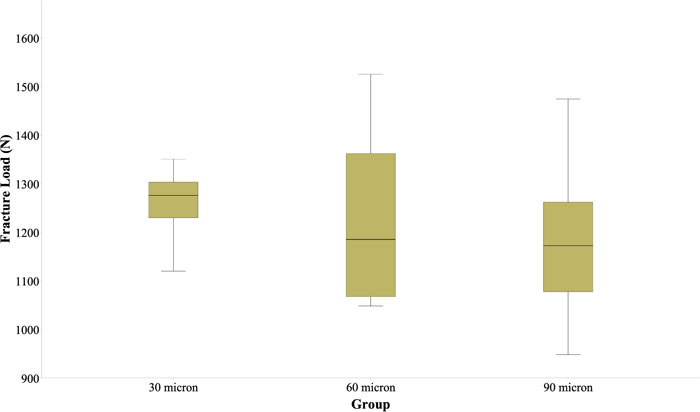
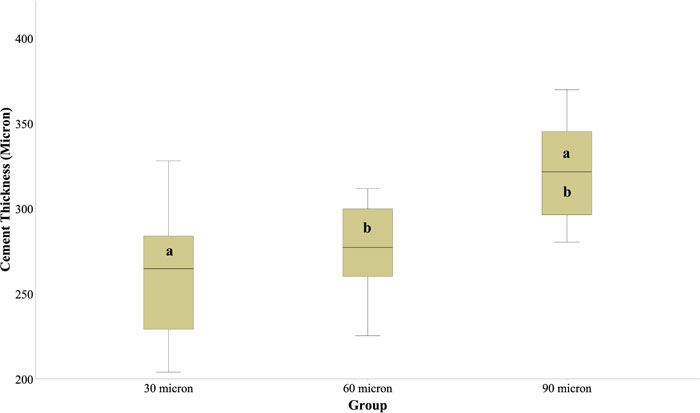
Mean fracture loads and standard deviations values in N were 1267.57 (±122.82), 1225.20 (±179.46) and 1180.76 (±161.77) for the crowns with 30, 60 and 90µm adhesive gap setting, respectively (Fig. 1). One-way ANOVA revealed no statistically significant difference between the mean fracture loads of the 3 groups (P = 0.551). The mean cement thickness and standard deviation values in μm were 260.9 (±39.6), 276.4 (±28.4) and 322 (±31.1) for the crowns with 30, 60 and 90µm adhesive gap setting, respectively (Fig. 2). One-way ANOVA revealed a statistically significant difference between the mean cement thickness of the 3 groups (P = 0.004). Post-hoc Tukey’s test showed significantly higher cement thickness for the group with 90µm adhesive gap setting in comparison to the other 2 groups. Pearson’s correlation revealed no statistically significant correlation between fracture load and the cement thickness (r=-0.357, P = 0.086).
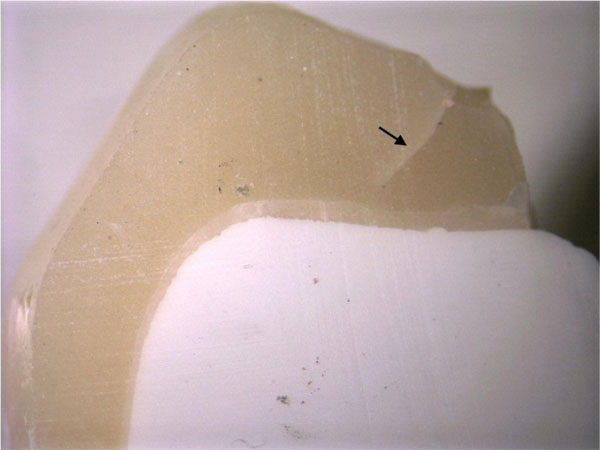
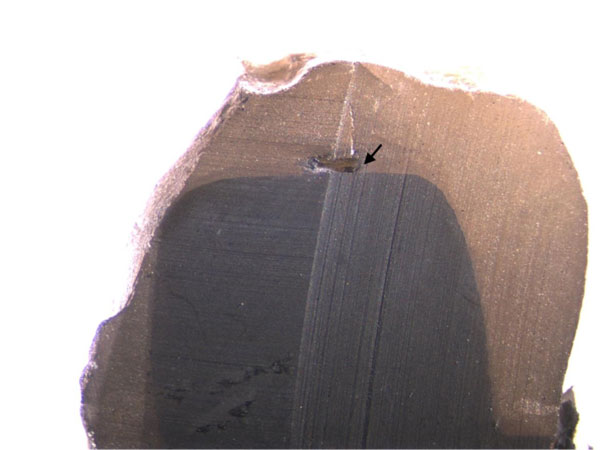
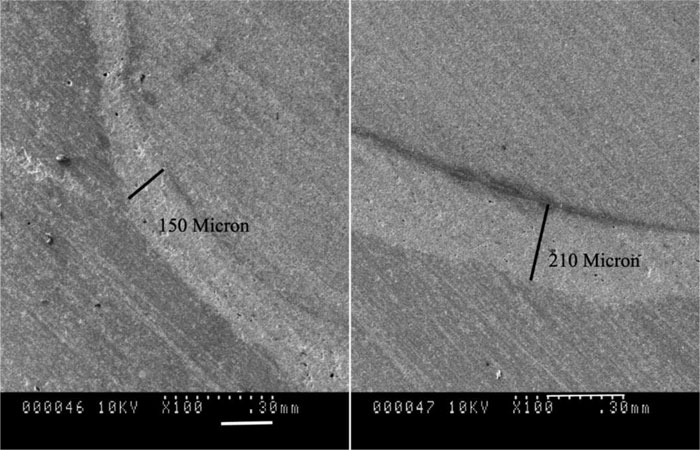
All crowns failed catastrophically and were not repairable. All fractures were confined to the ceramic material and none of them progressed to the die material. Visual examination revealed that failure originated in the contact area as a cone crack and propagated within the ceramic material till at reached the cement layer (Fig. 3). All the samples showed delamination of part of the crown at the cement interface with the other part still attached to the die material. Some large voids were noticed in the cement layer occlusally (Fig. 4). SEM images showed a homogenous ceramic structure with voids within the cement layer and adequate adaptation of the cement at the interfaces with the die and ceramic materials. Measuring the cement thickness from the SEM images revealed non-uniform thickness with higher thicknesses at the occlusal surface in comparison to the axial surfaces (Fig. 5).
4. DISCUSSION
This study failed to prove the alternative hypothesis and accepted the null hypothesis that there is no statistically significant difference between the mean fracture load values for the groups with different adhesive gap settings.
The present study followed the recommendations described by Kelly to achieve a clinically-relevant in-vitro load-to-failure test for all-ceramic restorations, including using a die material with elastic modulus matching the dentin, preparing the teeth according to clinical guidelines, using crowns with clinically-relevant dimensions and using a reliable, commonly-used luting cement [23]. Epoxy dies were used to avoid the variability that can be encountered with natural teeth.
The use of 3-mm stainless-steel ball in the present study is expected to increase the contact pressure within the crowns compared to the clinical contact pressure. Several factors might influence the contact pressure, including the radius of the loading ball and the ratio of the elastic moduli of the dental porcelain and the loading ball [24]. Alternative approach would be to use a tin sheet as a stress breaker between the load applicator and crown, a loading ball with a lower modulus of elasticity or a stainless-steel loading stylus with its end machined to a curvature corresponding to 40-50 mm diameter to induce clinically relevant contact pressure [23]. The contact pressure employed in this study, however, should not affect the comparison between the groups since all groups were treated equally. It has to be emphasized that the fracture load data reported in the current study should not be considered as “absolute” values and extrapolating these in-vitro data to the clinical performance must be considered cautiously and within the limitation of the study [25].
The fracture strength of Vita Mark II molar crowns was reported previously in the literature with a reported range between 600 and 3000 N [5, 26-28]. The mean fracture load of Vita Mark II crowns in the present study ranged between 1182 and 1267 N, which falls within the previously reported range. As expected for monolithic all-ceramic crowns, all Vita Mark II crowns fractured catastrophically, involving the whole crown thickness [29].
The effect of the cement thickness on fracture resistance was evaluated in several studies as shown in Table 1. These studies differ in terms of the tested materials and methodology. Four of these studies reported a significant negative relationship between the cement thickness and fracture resistance, while one study reported a positive relationship and one study reported no significant association between the two variables. It has to be emphasized that the cement thickness ranges and measurement location varied between the studies. Generally, the studies which reported a significant negative relationship used wide range of thicknesses from 100μm or below to 300μm or above. Reduction in fracture resistance was noticed for the samples with cement thicknesses larger than 300μm. Similar to the present study, Sagsoz and Yanıkoglu [17] reported no difference in the mean fracture load for crowns made with different adhesive gap settings ranging between 30 and 150 μm without measuring the actual cement thickness.
It is apparent that the cement thickness is guided by the available gap between the crown and the prepared abutment. Several factors have been identified to affect the internal adaptation of the machinable all-ceramic crowns, including the angle of convergence, luting adhesive gap, luting cement composition and physical properties, occlusal anatomy, margin design and the scanning device technology [30-39]. It is obvious from the result of the present study that the adhesive gap setting does not reflect the actual cement thickness. This can be attributed to the acquisition and milling unit limitations. The cement thickness for the 60μm group falls within the previously reported by Zeltner et al. in which bluecam was used to scan preparation and crowns were milled using similar setting used in the current study [36]. Other studies reported lower mean thickness using bluecam and omincam with adhesive gap setting of 60, 70 and 80μm [32, 33, 40]. This can be attributed to the improvements in acquisition and milling devices. It worth mentioning that comparing the results of the present study to previous studies should be done with caution due to the differences in the methodology and acquisition and milling devices used. Interestingly, a recent systematic review revealed no significant effect of the impression technique (conventional versus digital) on the internal adaptation of full-coverage fixed restorations [41].
Rekow et al. [42] conducted factorial analysis of some variables influencing stresses in all-ceramic crowns using finite element analysis. They studied the effect of seven factors (crown material, crown thickness, cuspal inclination, cement elastic modulus, cement thickness, supporting tooth core, and location of occlusal loading). 80 and 100μm cement thicknesses were used. Cement modulus of elasticity and thickness accounted for only 5.5% and 1.4% of the variability in the principal stresses in the crown, respectively. These findings are in agreement with the present study. The higher mean cement thickness reported for different groups in the present study, which ranges between 260 and 322 μm, is not expected to change principal stresses within the crowns significantly. It seems that achieving cement thickness below 100μm occlusally is a challenging task. Pilo and Cardash evaluated the cement thickness under metal-ceramic crowns cemented using zinc phosphate cement to extracted teeth due to periodontal issues and reported occlusal cement thickness of 310μm [43]. Zeltner et al. [36] compared the internal adaptation of machined crowns using the digital workflow to crowns made using conventional workflow and heat-press technique as a control and found better internal adaptation for the control group compared to machined crowns, with mean occlusal internal gap for the machined crowns around 200μm and 89 μm for the control group.
CONCLUSION
Within the limitations of this in vitro study, the following conclusions can be drawn:
- There is no statistically significant effect of using different adhesive gap settings (30, 60 and 90 µm) on the fracture strength of all-ceramic crowns.
- Varying the cement thickness (200 - 360 µm) does not affect the fracture strength significantly.
- The adhesive gap setting does not reflect the actual cement thickness for the milled crown.
ETHICS APPROVAL AND CONSENT TO PARTICIPATE
Not applicable.
HUMAN AND ANIMAL RIGHTS
Not applicable.
CONSENT FOR PUBLICATION
Not applicable.
AVAILABILITY OF DATA AND MATERIALS
Not applicable.
FUNDING
None.
CONFLICT OF INTEREST
The authors declare no conflict of interest, financial or otherwise.
ACKNOWLEDGEMENTS
Declared none.

